Introduction
Picture this: you’re halfway through an important video call in your converted garage office when your WiFi decides to take a coffee break. Sound familiar? Extending WiFi to outbuildings has stumped more homeowners than assembling IKEA furniture blindfolded.
Here’s the thing – your internet connection doesn’t have to stop at your front door. Whether you’ve got a she-shed that needs Netflix or a workshop where YouTube tutorials are essential, getting solid connectivity to detached buildings isn’t rocket science. It just requires the right approach.
Let’s cut through the tech jargon and explore six methods that actually work, from budget-friendly fixes to bulletproof solutions that’ll make your neighbors jealous.
The Great WiFi Escape: Why Signals Struggle to Reach Outbuildings
Your WiFi signal faces a brutal obstacle course between your house and that detached structure. Think of it like trying to have a conversation across a crowded stadium – the further you get, the harder it becomes to hear clearly.
Distance naturally weakens signals. Most home routers start losing steam around 100-150 feet indoors, and outdoor performance drops even faster. Add some walls, trees, or weather into the mix, and you’ve got a recipe for connection chaos.
Materials matter more than you’d think. Wood frame construction? No problem. Brick walls? Getting tougher. Metal siding or concrete blocks? Your WiFi signal just hit a brick wall – literally. These dense materials absorb or reflect radio waves like a black hole swallowing light.
Environmental interference creates invisible roadblocks. Your neighbor’s WiFi, that old microwave in the garage, even your car’s keyless entry system can scramble signals. This creates those maddening WiFi dead zones where you can see the network name but can’t actually connect.
Solution 1: Mesh Network Magic – The Premium Play
Imagine having a team of WiFi cheerleaders positioned around your property, each one catching and re-throwing your internet signal to the next. That’s essentially how a mesh network system operates.
The Mesh Advantage
Unlike traditional routers that broadcast from a single point, mesh systems deploy multiple nodes that collaborate seamlessly. Each node talks to its neighbors, creating an invisible web of connectivity that blankets your entire property.
When you walk from your kitchen to your workshop, your smartphone automatically hops between nodes without missing a beat. No password re-entry, no connection drops – just smooth sailing from building to building.
Modern mesh systems like the latest Eero models or ASUS ZenWiFi can handle properties spanning several acres with proper node placement. You’ll typically need 3-4 nodes for most residential setups with outbuildings.
The Reality Check
Strengths:
- Zero handoff delays between coverage areas
- Centralized management through smartphone apps
- Automatic failure recovery if one node goes down
- Scales easily as you add more buildings
Limitations:
- Higher initial investment ($250-700)
- Every node needs AC power
- More complex than simpler alternatives
Perfect for: Multi-building properties, tech enthusiasts, or anyone who wants “set it and forget it” reliability.
Solution 2: Point-to-Point Precision – The Sniper Approach
Sometimes you don’t need to carpet-bomb your entire property with WiFi – you just need a surgical strike to one specific building. Enter the point-to-point wireless bridge.
How Bridge Technology Works
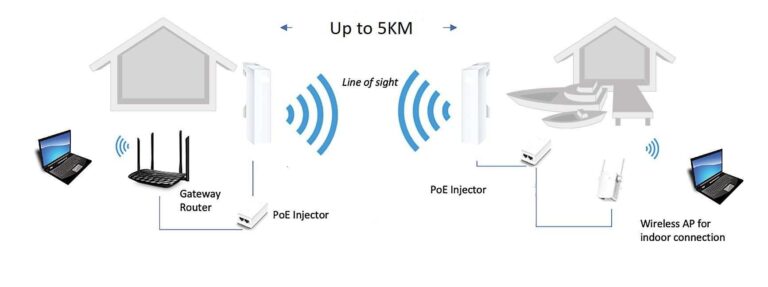
Think of this as building an invisible ethernet cable through the air. You install one wireless access point near your main router and its twin in your target outbuilding. These units lock onto each other and create a dedicated data highway.
Popular bridge kits like the Ubiquiti NanoBeam series or EnGenius ENS series can maintain rock-solid connections across distances that would make other solutions weep. We’re talking 300-500 feet with minimal speed loss.
Setting Up Your Bridge
The beauty lies in the simplicity. Most modern bridge kits include setup wizards that walk you through the pairing process. Point unit A at unit B, run the configuration software, and you’re typically online within 30 minutes.
Pro tip: Clear line of sight dramatically improves performance, but these systems can punch through moderate obstacles like tree branches or light structures.
Ideal scenarios: Single outbuilding connections, workshops needing maximum bandwidth, or anywhere you need dedicated connectivity without sharing bandwidth with other devices.
Solution 3: Powerline Adapters – Your Home’s Hidden Network
Here’s a clever trick most people don’t know: the electrical wires already running through your walls can moonlight as data cables. Powerline adapters turn your existing electrical system into a network backbone.
The Powerline Process
Its partner plugs into an outlet in your outbuilding and either provides ethernet ports or broadcasts a new WiFi network from that location.
The magic happens inside your electrical wiring. The adapters inject high-frequency data signals onto the power lines, where they piggyback on the 60Hz electricity flowing to your outbuilding.
Performance Reality
Success varies wildly based on your electrical setup. Newer homes with quality wiring might see speeds approaching 200 Mbps, while older properties could struggle to maintain 30 Mbps. Circuit breakers, surge protectors, and electrical noise all impact performance.
Critical requirement: Your outbuilding must share the same electrical panel as your main house. Separate electrical services won’t communicate through powerline technology.
Best applications: Same-circuit outbuildings, rental situations where cable installation isn’t allowed, or quick temporary solutions.
Solution 4: Signal Boosters and Repeaters – The Budget Warriors
When you need internet access without breaking the bank, WiFi repeaters and signal amplifiers offer the most affordable entry point for extending WiFi to outbuildings.
Understanding Repeater Logic
A WiFi repeater captures your existing router’s signal and rebroadcasts it with fresh strength. Think of it as a relay runner in a WiFi marathon – it takes the signal baton and carries it further down the track.
The trade-off? Since the repeater must both receive and transmit using the same radio, your effective bandwidth gets cut roughly in half. Still, half of a good connection often beats no connection at all.
Strategic Positioning Matters
Location determines everything with repeater success. Position your device at the sweet spot where it still receives strong signal from your main router but can broadcast effectively toward your target building.
For a garage 150 feet from your house, place the repeater about 75 feet out – maybe in a window facing the target building or on an exterior wall with power access.
Perfect for: Budget-conscious solutions, occasional internet needs, or temporary setups where you don’t want permanent installations.
Solution 5: Hardwired Ethernet – The Bulletproof Option
Want guaranteed gigabit speeds regardless of weather, interference, or neighbor activity? Ethernet cable installation delivers bulletproof connectivity that wireless solutions can’t match.
Professional vs DIY Installation
Professional installation typically runs $4-10 per foot depending on terrain complexity and local labor rates. For a 200-foot run to your workshop, budget $800-2,000 including trenching, conduit, and weatherproofing.
DIY installation cuts costs significantly but demands proper planning. You’ll need outdoor-rated Cat6 cable, trenching tools, protective conduit, and patience. Most areas require burial depths of 18-24 inches to prevent damage from lawn equipment.
The Long Game
Ethernet connections provide decades of reliable service once properly installed. No speed degradation, no weather outages, no interference issues – just consistent performance that makes other connectivity methods jealous.
Ideal situations: Permanent home offices, business applications requiring guaranteed uptime, or properties where wireless solutions consistently disappoint.
Solution 6: Independent Internet Service – The Nuclear Option
Sometimes the smartest move involves bypassing your main house connection entirely. Getting dedicated internet service for your outbuilding sounds expensive, but it’s often more affordable than you’d expect.
When Independence Makes Sense
Consider separate service if your outbuilding sits beyond the practical range of other solutions (typically 400+ feet), houses business operations requiring backup connectivity, or needs internet access even when your main house loses service.
Modern satellite internet services like Starlink have revolutionized rural connectivity options. Monthly costs often compare favorably to installing and maintaining complex wireless bridge systems.
Best applications: Large properties, business use, backup internet requirements, or situations where other methods consistently fail to deliver adequate performance.
Choosing Your Perfect Match
For Detached Garages
Most garages sit within 100 feet of the main house, putting them in the sweet spot for mesh systems or point-to-point bridges. If your garage shares the same electrical panel, powerline adapters offer an economical starting point.
For Workshops and Creative Spaces
Creative work often demands reliable streaming for music, tutorials, or video calls with clients. A dedicated wireless bridge provides professional-grade performance without ongoing monthly fees.
For Guest Houses and Remote Offices
Professional work environments can’t tolerate dropped connections during important calls. Direct ethernet installation or premium mesh networks ensure business-critical reliability.
for Barns and Agricultural Buildings
Metal construction creates unique wireless challenges. Point-to-point systems with external antenna mounting often provide the only viable wireless option, positioned to minimize metal interference.
Installation Wisdom: Tips from the Trenches
Pre-Installation Site Survey
Walk your property with a WiFi analyzer smartphone app to map signal strength patterns. Identify complete dead zones and areas with marginal coverage – this intelligence guides equipment placement decisions.
Test connectivity at different times throughout the day. Network strength fluctuates as neighbors use their systems and atmospheric conditions change.
Power Planning Considerations
Every wireless solution requires electricity at both ends. Plan outlet locations before finalizing equipment placement. Solar-powered options exist for remote locations but require battery backup and regular maintenance.
Weatherproofing Essentials
Outdoor equipment faces harsh conditions year-round. Look for IP65-rated enclosures or better. Even weatherproof equipment benefits from additional protection like equipment shelters or roof overhangs.
Router Optimization First
Before adding extension equipment, maximize your main router settings. Update firmware to the latest version, switch to less congested channels, and verify optimal antenna positioning for maximum coverage.
Troubleshooting the Usual Suspects
Signal Present But Speed Lacking
Multiple devices competing for bandwidth often cause slowdown issues. Check connected device counts and consider upgrading to higher-capacity equipment if you’re maxing out your current system.
Connection Drops Randomly
Loose connections cause most intermittent problems. Verify all cable connections are secure and properly weatherproofed. Corrosion at connection points gradually degrades performance over time.
Equipment Works Then Stops
Overheating kills more outdoor networking equipment than weather exposure. Ensure adequate ventilation around all devices and consider adding cooling fans in enclosed installations.
Investment Analysis: Cost vs Performance
| Approach | Equipment Investment | Setup Complexity | Monthly Costs | Performance Rating |
| Mesh Network | $250-700 | Simple | None | Excellent |
| Wireless Bridge | $150-400 | Moderate | None | Very Good |
| Powerline Adapter | $60-180 | Simple | None | Variable |
| Signal Repeater | $40-120 | Simple | None | Good |
| Direct Ethernet | $300-1,200 | Complex | None | Outstanding |
| Separate Service | $50-150 | Professional | $40-100/month | Excellent |
FAQ’s
How do I overcome WiFi challenges in metal buildings?
Metal structures act like giant Faraday cages, blocking wireless signals almost completely. Your best bet is installing point-to-point wireless bridges with antennas mounted outside the metal walls. Run weatherproof cables through small entry points to connect indoor access points that broadcast WiFi inside your building.
What’s the maximum distance for extending WiFi to outbuildings?
Mesh networks typically handle up to 250 feet with obstacles, while wireless bridges can reach 400+ feet with clear sightlines. Direct cable runs work reliably up to 328 feet without signal enhancement.
Can I extend WiFi without electricity in my outbuilding?
Power over Ethernet (PoE) technology can deliver both data and electricity through a single cable, eliminating the need for separate electrical service in some configurations. Solar charging stations can power low-consumption devices in completely off-grid situations.
Wrapping Up Your WiFi Extension Journey
Extending WiFi to outbuildings doesn’t require an engineering degree or unlimited budget. The key lies in matching your solution to your specific situation, budget, and performance requirements.
Most homeowners find success with either a quality mesh network for comprehensive property coverage or a point-to-point bridge for single-building connections. These approaches deliver the sweet spot of performance, reliability, and reasonable cost.
Remember – there’s no universal “best” solution. Your perfect approach depends on your property layout, budget constraints, technical comfort level, and long-term connectivity goals. Choose wisely, and you’ll soon enjoy seamless internet throughout your entire property – buffering wheels will become ancient history!
2 thoughts on “Extending WiFi to Outbuildings Made Easy and Secure”